*
*
Photobucket
A diary of both my life and my art work, a reflection of time and growth.
*
*

Thursday, November 30, 2006

Gift Bag Extravaganza! Bag #4


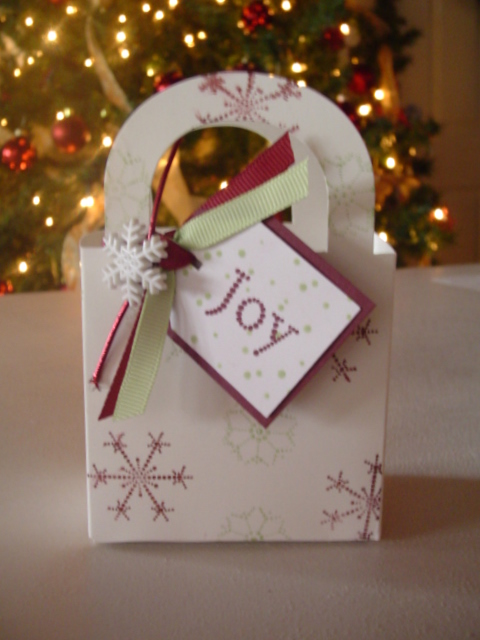
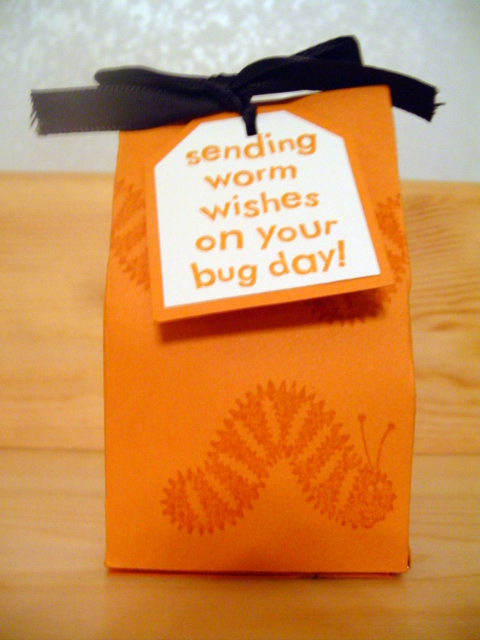
This gift tote was a fun and quick on the box I found at Michaels in the wedding section it is the cutest little gift tote! For this one I chose Snowflake spot to work worth I actually just got it and have been dying to use it. The snow flakes were stamped before I assembled the box in bravo burgundy and certainly celery, but be careful with this on because the box is glossy and the ink will smear easily. After I stamped the snowflakes on I used a heat gun to set and help dry the ink, put aside and let dry some more while I worked on the tag. I punched the tag out of whisper white using the tag punch used the snow from Snowflake Spot to create a background with certainly celery and the stamped joy in bravo burgundy, I then matted the whole tag with bravo burgundy paper and trimmed around the tag shape. I assemble the box and punched a hole in the tag to feed the burgundy and celery ribbon through and tied a knot I used burgundy cord to attach snowflake button and to tie down to the handle of the gift. I really like these two colors together!

Labels:

Wednesday, November 29, 2006

Gift Bag Extravaganza! Bag #3


Today's bag is a "case" from JulieHRR on splitcoaststampers. It is a vellum tote bag and it is gorgeous I will defininately be making more of these! First I scored the gift bag using the following instructions
  • Vellum Gift Bag
  • then I stamped the snow flakes using silver I used the Snow Flurries set from the Holiday Mini. Then I heat set the ink for quicker drying time, and continued to assemble the bag. Punched holes for the Ribbon and tied it on. This bag was fun to make! Thank you JulieHRR!

    Labels:

    Monday, November 27, 2006

    Gift Bag Extravaganza! Bag #2


    For this box I used the same pattern as posted below and I used background basics holly stamp to create a background. I used the holiday thyme designer paper along with true,thyme, bravo burgundy and whisper white paper. I used my creative memory cutting system to create the ovals and used warm words be merry stamped with rubble burgundy ink. The handle is made from ribbon and attached with brads. Tomorrow will be a whole new style of gift bag!

    Labels:

    Gift Bag Extravaganza!


    This week is going to be gift bag extravaganza!
    Every day I will be featuring a new bag!


    For this gift tote I started with bravo burgundy card stock I rolled with the jumbo woodcut holly roller that had the bravo burgundy cartridge inside over the entire card stock I then assembled the gift tote the dimensions for word the gift told are take your 8 1/2 x 11 card stock score at 3 inches the long way turn your card stock and score at to 2", 5", 7", and 10" leaving a 1" flap at the end. Cut the piece of flap that measure 1" x 3" of so you should have cut off the little corner, leaving a 5 1/2" x 1" flap. Now cut the score marks on the bottom to the 3" score in running lengthwise. Good to score he says that measure 2" need to be cut to a length of 2" will to go so you will have 2 @ 2" and 2 @ 3". Once you have this done you can assemble the box just like you would a 2,4,6,8, box. To decorate the box I use brush gold, handsome hunter, and bravo burgundy I layered those and adhered to the box. I then stamped the holly with versa mark and used gold embossing powder on it colored in the holly with markers. A holly is matted again with brush gold, handsome hunter, bravo burgundy. For the handle I used ribbon and brads to secure it.

    Labels:

    Wednesday, November 22, 2006

    Winter Wishes CD Holder


    I made this CD cover for a swap that I joined I found the instructions on splitcoaststampers. The big snowflakes is embossed with Navy blue embossing powder. The cd is covered with a CD sticker and stamped with snowflakes and is filled with all my favorite Christmas songs. The back is closed with a piece of velcro. Here is a complete list of instructions.

    CD Holder


    One sheet of cardstock... easy
    Cut long ways at 5 1/8 (so you have a piece that is 11x 5 1/8) Score this piece at 2.5 and again at 7.5

    Take the left over strip and cut it down to 7 1/8.. It is already the perfect height. Score on each end at 1 inch. This is the inside piece that keeps the CD from sliding out. Glue to the inside pocket.

    The left over piece you can use to mat your main image.

    Labels:

    Monday, November 20, 2006

    We Have A Winner!!

    I would like to thank you all so much for helping me celebrate 5000 posts and counting! Now onto the exciting part!
    The winner is..........Drum roll here
    tyrymom29!!
    Please email me your address so I can get this in the mail to you!
    kellyshadow@yahoo.com

    Labels:

    Monday, November 13, 2006

    Blogtastic Milestone Giveaway !


    Wow! I can't believe my blog Diaries of Stampers has hit 5,000 views I never thought it would do that.. Thank you to all of you who stop on by for a looksie to see what I've been up to! I often wonder "Why would someone want to see what I‘m up to? I wanted to start a blog because my family and friends live so far away and never get to see what I’ve been up to unless I send them my creations, not to mention I wanted to share with other stampers who better to share with!. Thanks to all of you who visit me, you have inspired me to keep going! Thanks so much to all of you for without you 5000, views would not be possible!

    Now on to the giveaway! For all those that comment on this post between now and November 20th and answer the following questions:
    Favorite thing about Christmas?
    And Why?
    Will be entered in a draw for…..
    A paint can gift set, yet to be revealed , watch for it, it will be debuting later this week!


    As promised here is the gift set! I was recently inspired by some of the Santa cards that I saw on splitcoaststampers. I wanted to try and my own version. The base is made with real red card stock the belt is made from black and brushed gold card stock and the black belt part is woven through the gold buckle the sentiment was created from my a little alphabet set that I found out Wal-Mart per stamped it with versamark and then embossed it with gold embossed in powder. I used white boa to represent the fur lining a on Santas coat. I also added buttons. This gift set includes a nugget box in the Nuggets are stamped with Ho! !Ho! Ho!, in real red, a hot chocolate pouch, card, of course the can!

    Labels:

    Saturday, November 11, 2006

    Avery's 2,4,6,8, Box


    Just a little gift I made for a little boy I know it was his birthday yesterday. He is so sweet he made me a very cute card for my birthday so I wanted to return the favor. I used pumpkin pie cardstock and ink for this box along with the bugs and kisses set (I love this set). Stamped the greeting on WW paper and mounted again on pumpkin pie, used my fiskers rectangle cutter to punch two holes in the top and tied on some black ribbon.

    2,4,6,8 Box instructions
    1. Cut a sheet of cardstock to 8 1/2" x 5 1/2".

    2. Stamp sheet as desired.

    3. Insert scoring blade on paper cutter. Score at 2", 4", 6" and 8" along the 8 1/2" length side of cardstock piece. You will have a 1/2" section left over.

    4. Turn cardstock piece 90 degrees, and score entire length of cardstock at the 2" mark. (Your scoring blade will travel 8-1/2" down. The 5 1/2" side of cardstock piece will be against the bottom lip of your paper cutter).

    5. Look at your scored cardstock piece. Take scissors and trim off the 2" x 1/2" section (not the 3 1/2" x 1/2" section). *Note: The 3 1/2" x 2" sections are the box top and the 2" x 2" sections are the box bottom.

    6. Cut each 2" score mark along the 8 1/2" side. (You will be making three straight cuts, each along the 2" score marks). Do not cut beyond the long score mark running the length of the 8 1/2" side.

    7. Fold along all score marks.

    8. Place a section of sticky strip tape along the 3 1/2" x 1/2" flap on the decorated/stamped side. Seal the top part of the box closed.

    9. Fold up the four 2" x 2" pieces; this is the bottom of your box. Use a sticky strip on the last 2" x 2" piece to seal the bottom of the box.

    10. You will be forming the top of the box similar to a milk carton: Look at your box and find the side that looks best for your front. This front section and the back section of your box will remain flat. You will be 'denting' in the two sides of the box until you can pinch the top of the box flat.

    11. I notched my sides with a rectangle hand-held punch and tied closed with ribbon

    Labels:

    Friday, November 10, 2006

    Snowman Paint Can for Joni's Secret Swap!!


    I joined Joni's Secret Swap on Splitcoaststampers the idea was to pick someone and make the a decorated one pint paint can, so I chose someone I didn't know and this is what I sent her.

    I love snow and really love working with the cold play set, so I started with some printed paper that I found at Walmart and used modgepodge to secure it to the can, the modgepodged the outside of the paper as well, set aside and let it dry for about 15 mins. I then assembled the snowman together and added their hats (from the bundle up set). After the can was dry I added a snowy hill using my wavy CM cutter adhered the snowman and put another layer of modgepodge over them, set aside and let dry.

    The gift also included a nugget box and hot chocolate pouch made from the same paper pack. For the card I used Bashful Blue and Night of Navy cardstock with some more of the printed paper and the cold play set. Added some ribbon and a buckle on the side for a little more decoration as it seemed to me the card was missing something.

    Labels:

    Thursday, November 09, 2006

    Santa Popcorn Slide


    I made this using a hand drawn template that I found on Splitcoaststampers, under Dawn Griffith's gallery. I altered the pattern a bit to accommodate a package of microwave popcorn.
    I traced the template onto real red cardstock, and cut out the pattern in Dawn's gallery also includes the beard,face,moustache, and nose.So I cut traced and cut out all the pieces for the face for the nose I used a dimensional and for the eyes I embossed with navy blue, and assembled them together, Crimped some paper for the rim of Santa's hat and put aside. On the body of Santa I stamped, with versamark, believe with Inkadinkado's Believe stamp, and then embossed with gold embossing powder. I did the same for Santa' hat using SU's BG Basic's star. I attached the face and hat rim with double sided tape, and made a hole using my eyelet setter to feed ribbon through the top of Santa's hat.

    Labels:

    Wednesday, November 08, 2006

    Loads of Birthday Love


    Loads of Love was one of my first sets, so when I look back on the cards I have using that set I was never all that happy,( I didn't own proper coloring supplies at the time)and I was totally new to stamping. So it has sat in my stamp room for the past 2 years collecting dust, I had actually been talking to a friend who has done the same thing with hers, so I decided to dust it off and try again, after seeing so many wonderful cards on splitcoaststampers. So be gentle with me it has been a long time since I have worked with this set.

    I stamped the truck on Bashful Blue cardstock and then masked the truck off and stamped on all the trees in Handsome Hunter except for one that landed in the black ink (oops). I then colored the truck in with prisma pencils and gamasol. Then I used itty bitty bg's with white craft ink to make the snowy road, and embossed with winter white embossing powder and layered it a few times. I stamped the falling snow with white craft ink and embossed with winter white EP again, I finished with a book plate from the aged copper hodgepodge set, and ribbon then mounted on real red cardstock that had been stamped with snowflakes from the snowflake set.

    Big thanks for all you who are coming to visit my blog I really enjoy reading your comment they are so inspiring. Thank you!

    Labels:

    Tuesday, November 07, 2006

    Snowflake Dreams Birthday Gift Set


    I made this gift set for my good friend Erica, when I started the set I had no idea what it was that I wanted to do for her. I started with a small paint can and added twinkley pink paper from Creative Memories Disney Princess Paper pack, add the crown and glued on matching pink boa. I was stumped as to what image to use on the front of the can, I wanted sparkle but any traditional birthday image just didn't work for me so, because of my love for Christmas and all things glittery I decided on a no traditional snowflake a nice pink glittery one. I stamped the snowflake in versamark on pretty in pink cardstock and used SU heat and stick powder then added SU retired Rose Glitter and heat to set, then mounted on to Whisper White Cardstock. I added to eyelets in pretty in pink to fed ribbon through, knotted the ends and adhered the snowflake with double sided tape.

    For the inside of the can I made a nugget 3 nugget box with SU pretty in Pink cardstock as the box and Creative Memories Disney Princess Paper pack as the outer wrap for the box the nugget labels are stamped with snowflakes in pretty in pink. The take was made with Pretty in Pinks CS mounted on Whisper White CS, then stamped with a snowflake in versamark and I added a snow glitter I found at Michaels and heated to set punched a hole and tied a ribbon knot.

    The hot chocolate pouch is a regular pocket card in Pretty in Pink CS stamped with SU's Bravo Burgundy and Pretty in Pink ink and a strip of Whisper Whites CS was added to the flap of the pocket.

    Finally the Card I had suck a hard time with card because it just didn't seem birthday enough, but I love it anyway. I stamped a snowflake on Pretty in Pink CS in versamark and added heat and stick powder and heated then applied rose glitter and heat to set again, mounted that image on Whisper white CS and added ribbon on two corners. I used Pretty in Pink CS as the card base and stamped snow flakes in pretty in pink ink, the used versamark again, with the heat and set and glitter to add celebrate.

    I hope she enjoys this set as much as I did making it, I may just make on for myself as well.

    Labels:

    Saturday, November 04, 2006

    Winter Wishes Gift Set


    This is my version of the SCS challenge for Dirty Snowflakes that was on a few weeks ago. I really like how these turned out, I think the browns and cool Caribbean work really well together. I stamped first the little cool Caribbean snowflakes then the larger chocolate chip flakes, next I used the medium flake with close to cocoa, and finished with the small flake and a stamped off close to cocoa. I covered the image with veramark and added iridescent ice embossing powder and heat set. I then mounted the image on Close to cocoa cardstock, and then mounted that to chocolate chip cardstock, add the hodgepodge and ribbon, and adhered it to cool Caribbean cardstock. They are so glittery in person, the camera doesn't quite catch it all.

    Labels:

    Friday, November 03, 2006

    Sleigh Ride


    I received this image from a friend, so this is my first time working with House Mouse stamps. Other then a smudge next to the berries I am happy with how it turned out. I used prisma pencils and the gamasol technique to color in the image, and I'm not sure if you can tell, but I used white embossing powder on the snow along with some glitter to give it a glistening effect, show much better in person. The cardstock is SU night of navy, whisper white and brushed gold, along with some navy grosgrain ribbon. I can't wait to use some of the other images I have House mouse stamps are so fun to work with.

    Labels:

    Thursday, November 02, 2006

    Believe in Santa


    I just love this stamp from Stampfrancisco I'm playing around with it a bit, trying to come up with some card designs for some Santa fans on my Christmas card list. I stamped Santa in Cranberry Crisp on vanilla cs, and matted the image on brushed gold cs. The believe stamp is stamped in versamark and embossed with gold embossing powder, the photo doesn't show it too well. Added a ribbon and called it done. Nice and simple let me know what you think is it a keeper or does it need something else?

    Labels:

    Wednesday, November 01, 2006

    ABC Card for a Teacher's Birthday


    This is a card I made for my daughters learning resource teacher's birthday, I cased this from the SCS gallery, I just couldn't seem to come up with anything on my own for this time. I can't remember who the artist was sorry, please forgive me.

    Supplies used:
    Canvas BG, Bugs and Kisses, Letterpress Alphabet,Small Script, always artichoke, whisper white, night of navy paper, pumpkin pie,night of navy,always artichoke and black ink. Hodgepodge Hardware, brads, Tangerine grosgrain ribbon, paper piercer, and dimensionals.

    Labels:

    Top Scrapbooking Blogs

    Powered by Blogger

    Check out..
    Check out the Top 50 Stamping sites!
    ..these Stamping sites!