
M&M Card and Clear 2,4,6,8, Box!
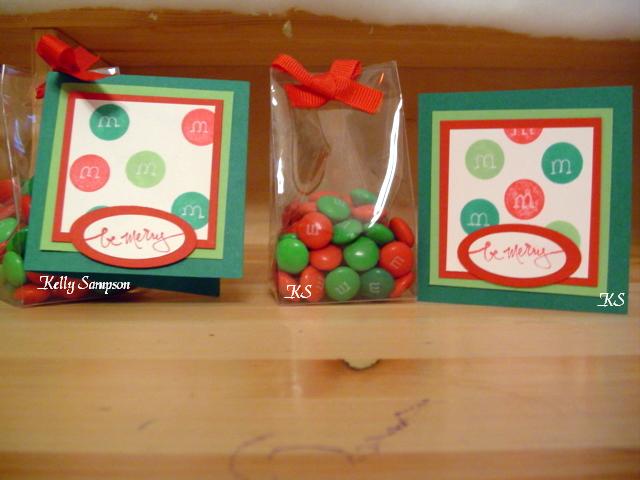
I have been trying to find away to use the M&M poem about the story of Christmas so I decided to make a 2,4,6,8, box that you would be able to see the M&M's in. I made the clear 2,4,6,8 box from a half a sheet of window sheet (I will include directions at the end) and filled with holiday M&M's and tied it closed with a red ribbon. The card is 3x3 and is made with glorious green card stock, I stamped the M&M's using the circle from the riveting set, using glorious green, real red, and green galore the M was written on with a white gel pen. I then matted the M&M's to real red, and again on to green galore and adhered to the glorious green 3x3 card. I then cut 2 ovals using the oval punches and used the "be merry" stamp from worm words stamped in real red ink to stamp on the smallest oval and matted with the larger oval and adhered to the front of the card. Inside the card has the following poem:
As you hold these candies
In your hand,
And turn them,
You will see.
The M becomes a W,
An E, and then a 3.
They tell the Christmas story,
It's one I'm sure you know.
It took place in a stable.
A long, long, time ago.
The E is for the East,
Where the star shone so bright.
The M is for the Manger,
Where Baby Jesus slept that night.
The 3 is for the Wise men,
Bearing gifts, they say they came.
W is for Worship, Hallelujah, Praise His Name.
So as you eat these candies,
Or share them with a friend.
Remember the meaning of Christmas,
It's a Love story that never ends.
2,4,6,8 Box
1. Cut a sheet of cardstock to 8 1/2" x 5 1/2".
2. Stamp sheet as desired.
3. Insert scoring blade on paper cutter. Score at 2", 4", 6" and 8" along the 8 1/2" length side of cardstock piece. You will have a 1/2" section left over.
4. Turn cardstock piece 90 degrees, and score entire length of cardstock at the 2" mark. (Your scoring blade will travel 8-1/2" down. The 5 1/2" side of cardstock piece will be against the bottom lip of your paper cutter).
5. Look at your scored cardstock piece. Take scissors and trim off the 2" x 1/2" section (not the 3 1/2" x 1/2" section). *Note: The 3 1/2" x 2" sections are the box top and the 2" x 2" sections are the box bottom.
6. Cut each 2" score mark along the 8 1/2" side. (You will be making three straight cuts, each along the 2" score marks). Do not cut beyond the long score mark running the length of the 8 1/2" side.
7. Fold along all score marks.
8. Place a section of sticky strip tape along the 3 1/2" x 1/2" flap on the decorated/stamped side. Seal the top part of the box closed.
9. Fold up the four 2" x 2" pieces; this is the bottom of your box. Use a sticky strip on the last 2" x 2" piece to seal the bottom of the box.
10. You will be forming the top of the box similar to a milk carton: Look at your box and find the side that looks best for your front. This front section and the back section of your box will remain flat. You will be 'denting' in the two sides of the box until you can pinch the top of the box flat.
11. I notched my sides with a rectangle hand-held punch and tied closed with ribbon
posted by Kelly at 6:59 AM
![]()
![]()


2 Comments:
I never heard that story about the m&m's. Thanks for sharing that. I will be using that!
Thank you for sharing the M&M story. I had never heard it before. Will definitely have to use it too. Love your projects!!
Post a Comment
<< Home